
LibreNMS Docker Deployment on Raspberry Pi 5
Date: May 13, 2025
Category: Monitoring / Raspberry Pi Projects
Backlink: You can add this to a “Pi5 Monitoring Projects” page or your “Homelab Projects” index
Project Overview
This guide walks through setting up LibreNMS on a Raspberry Pi 5 (64-bit) using Docker Compose, then configuring SNMP on the Pi to allow it to be monitored—including fixing the common “No Processors” graph error by enabling extend support in SNMP for /proc/stat.
Prerequisites
-
Raspberry Pi 5 running 64-bit Raspberry Pi OS (Bookworm or similar)
-
Docker and Docker Compose installed
-
Static IP (e.g.
192.168.1.174) -
Basic familiarity with SSH and Linux commands
Step 1: Docker Setup
Install Docker (skip if already installed):
curl -fsSL https://get.docker.com -o get-docker.sh
sudo sh get-docker.sh
Step 2: Clean Up Old LibreNMS Docker Setup (if any)
docker stop $(docker ps -aq)
docker rm $(docker ps -aq)
docker volume prune -f
rm -rf ~/librenms
Step 3: Set Up LibreNMS Docker Files
Create a new folder:
mkdir ~/librenms && cd ~/librenms
Download example files from the official repo:
wget https://raw.githubusercontent.com/librenms/docker/master/examples/compose/compose.yml
wget https://raw.githubusercontent.com/librenms/docker/master/examples/compose/.env
wget https://raw.githubusercontent.com/librenms/docker/master/examples/compose/librenms.env
wget https://raw.githubusercontent.com/librenms/docker/master/examples/compose/msmtpd.env
Step 4: Edit .env File
nano .env
Set your timezone and user/group IDs:
TZ=America/Chicago
PUID=1000
PGID=1000
Step 5: Start the Docker Stack
docker compose -f compose.yml up -d
Once all containers start, LibreNMS will be accessible at:
📍 http://<PI-IP>:8000 (e.g., http://192.168.1.174:8000)
Step 6: Create LibreNMS User
Once web UI is accessible, create your first admin user through the setup wizard.
Step 7: Install and Configure SNMP on the Pi
Install SNMP daemon:
sudo apt update
sudo apt install snmpd snmp -y
Edit /etc/snmp/snmpd.conf:
sudo nano /etc/snmp/snmpd.conf
Modify/add the following:
agentAddress udp:161
rocommunity public
sysLocation Sitting on a Dusty Shelf
sysContact Me <zippybytes@protonmail.com>
extend cpuinfo /bin/cat /proc/stat
Restart the SNMP service:
sudo systemctl restart snmpd
Step 8: Verify SNMP Works
snmpwalk -v2c -c public localhost 1.3.6.1.2.1.1
snmpwalk -v2c -c public localhost system
Expected result includes system description, contact, location, and uptime.
Step 9: Fix “No Processors” Graph Issue
If LibreNMS shows “Error Drawing Graph: No Processors”:
Ensure extend cpuinfo /bin/cat /proc/stat is set in /etc/snmp/snmpd.conf, then test it:
snmpwalk -v2c -c public localhost NET-SNMP-EXTEND-MIB::nsExtendOutputFull.\"cpuinfo\"
You should see actual /proc/stat data returned.
Final Test
-
Go to Devices > Add Device in LibreNMS.
-
Enter:
-
Hostname/IP:
192.168.1.174 -
SNMP Version:
v2c -
Community:
public
-
-
Click Add Device.
After polling completes (5–10 mins), graphs will populate correctly, including CPU usage.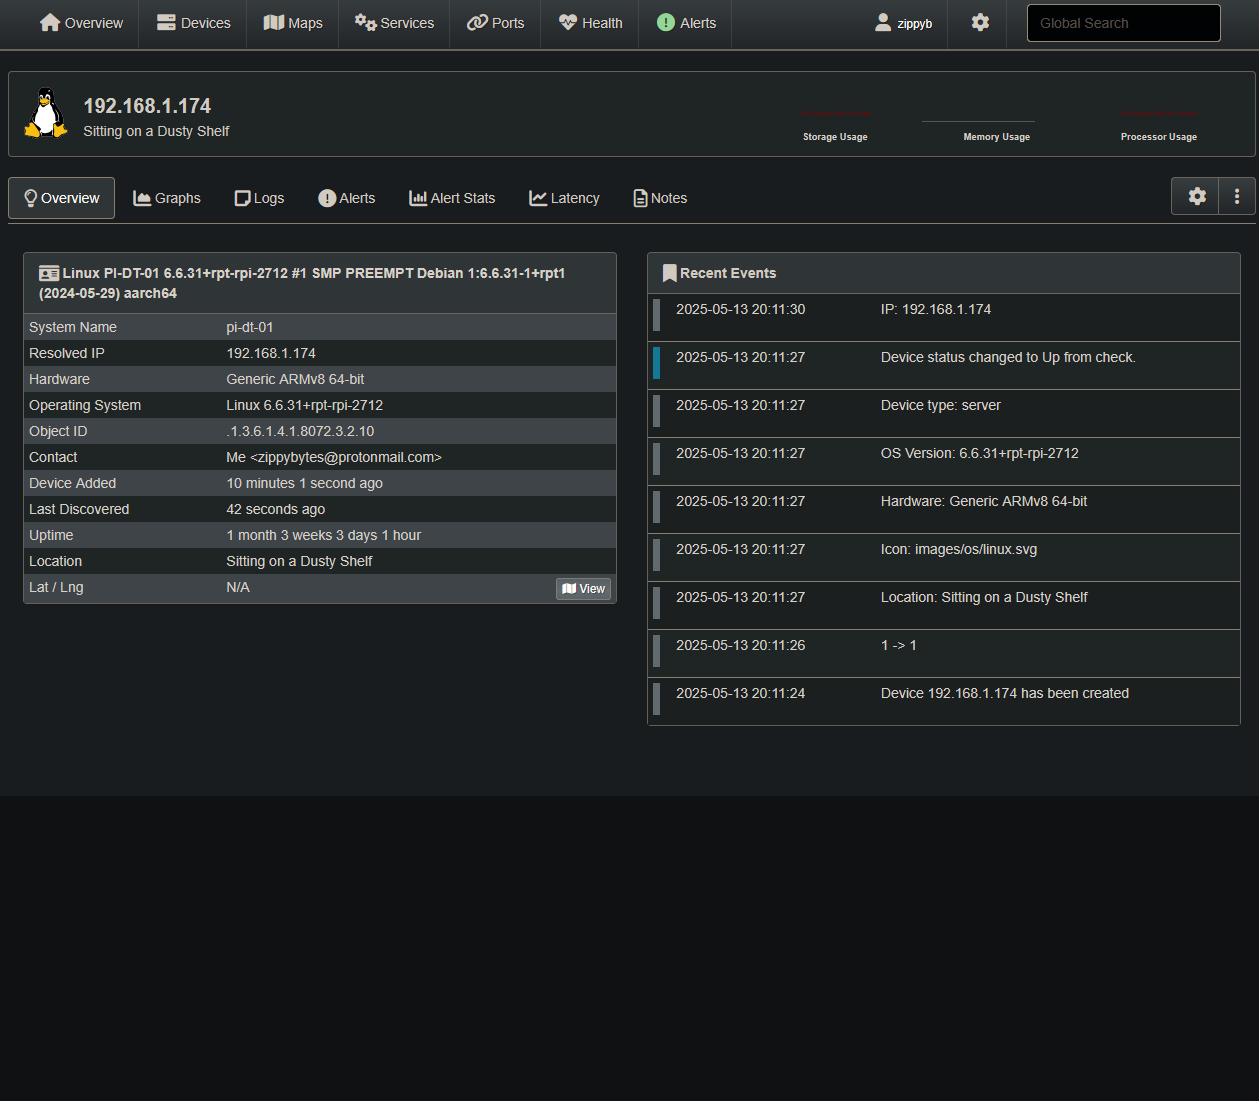
📚 Notes
-
If SNMP errors appear during walk attempts, ensure MIBs are installed:
sudo apt install snmp-mibs-downloader -y sudo sed -i 's/^mibs :/#mibs :/' /etc/snmp/snmp.conf -
Reload or restart SNMP again:
sudo systemctl restart snmpd
📦 Services Started
-
librenms(Main Web Interface) -
librenms_db(MariaDB) -
librenms_redis -
librenms_syslogng -
librenms_snmptrapd -
librenms_msmtpd
🧭 Next Steps
-
Enable polling other devices (routers, switches, VPS)
-
Add disk, network, and service monitors
-
Create alerts for offline devices
-
Enable email notifications via
msmtpd.env
No Comments