02 - Project Notes
Here are where project notes go!!
- Update #19 - VPS Admin Toolkit Menu Script
- Update #18 - RKHunter Daily Scan with Email Alerting and Log Cleanup
- Update #17 - Installing Root Kit Detection on Virtual Private Server
- Update #16 - Installing Docker and Prepping My VPS for App Expandability.
- Update #15 - Using Gmail App Password to Get Alerts!
- Update #14 - Auto-Banning Fail2Ban IPs Based on AbuseIPDB Reputation
- Safely Updating and Upgrading a Production VPS Server with Backup Plan
- Update #13: Fail2Ban IP Lookup & Enrichment Script with GeoIP, PTR, and AbuseIPDB
- Update #12 - Step-by-Step Breakdown of UFW DDNS Update Script
- Reference: Commonly Used Commands & Scripts for Virtual Private Server
- Update #11 - Syncthing UFW DDNS Cron Recovery & Long-Term Rule Persistence
- Update #10 - Fail2Ban IP Geolocation Lookup Script with Auto Filtering
- Update #9 - Syncthing UFW Log Monitoring with Active Fail2Ban Enforcement
- Update #8 - Syncthing Systemd Recovery After Upgrade
- Update #7 - Syncthing UFW Rule Automation with DDNS Integration
- Update #6 - Fail2Ban Security Hardening - Longer Bans, Fewer Chances
- Update #5 - Dynamic Fail2Ban Ignore Rule with DDNS
- Update #4 - Automated Backups for BookStack on VPS - Secure & Scheduled
- Update #3 - Hardening Security of the BookStack.
- Command Guide To Backing Up Bookstack
- Guide: Backing Up Straight From The BookStack Website
- BookStack Backup Automation Every 6 Hours
- Raspberri Pi 5 NAS Setup Jeff Gerling
- BookStack VPS Migration & Setup Documentation
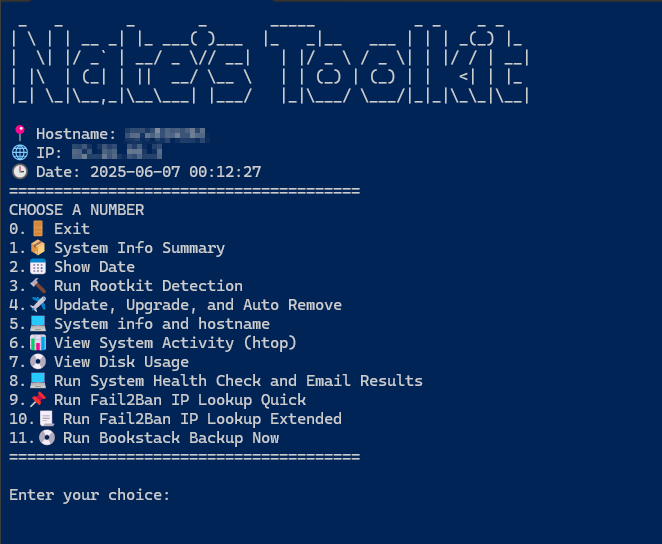
Update #19 - VPS Admin Toolkit Menu Script
Date: June 6, 2025
Category: Automation / CLI Utilities
Backlink: Update #18 – RKHunter Daily Scan with Email Alerting and Log Cleanup
🛠️ Features
-
Interactive numbered menu with clear options
-
Rootkit detection and security checks
-
Fail2Ban IP lookup (quick and extended)
-
One-command BookStack backup
-
Update/upgrade/autoremove automation
-
Live process monitoring with
htop -
Disk usage, uptime, and CPU info summaries
-
Network bandwidth stats using
vnstat -
Emoji and
figletfor enhanced terminal UX
📄 Full Script: ~/Scripts/taskmenu.sh
#!/bin/bash
clear

while true; do
        figlet "Nate's Toolkit"
        echo "📍 Hostname: $(hostname)"
        echo "🌐 IP: $(hostname -I | awk '{print $1}')"
        echo "🕒 Date: $(date '+%Y-%m-%d %H:%M:%S')"
        echo "======================================="
        echo "CHOOSE A NUMBER"
        echo "0.🚪 Exit"
        echo "1.📦 System Info Summary"
        echo "2.📅 Show Date"
        echo "3.🔨 Run Rootkit Detection"
        echo "4.✈️ Update, Upgrade, and Auto Remove"
        echo "5.💻 System info and hostname"
        echo "6.📊 View System Activity (htop)"
        echo "7.💿 View Disk Usage"
        echo "8.💻 Run System Health Check and Email Results"
        echo "9.📌 Run Fail2Ban IP Lookup Quick"
        echo "10.📃 Run Fail2Ban IP Lookup Extended"
        echo "11.💿 Run Bookstack Backup Now"
        echo "======================================="
        echo ""
        read -p "Enter your choice: " answer
        clear
        sleep 0.5
        if [ "$answer" = 0 ]; then
                echo "Exiting...."
                break
        elif [ "$answer" = 1 ]; then
                echo "📦 System Info Summary"
                echo ""
                echo "🖥️ CPU Info:"
                lscpu | grep 'Model name'
                echo ""
                echo "📊 System Load:"
                uptime
                echo ""
                echo "📶 Network Usage:"
                vnstat
                echo ""
                read -p "Press Enter to return to the menu..."
                clear
        elif [ "$answer" = 2 ]; then
                figlet $(date)
                echo ""
                read -p "Press Enter to return to the menu..."
                clear
        elif [ "$answer" = 3 ]; then
                echo "Running Rootkit Checker..."
                ~/rkhunter.sh
                echo "✅ Job Complete"
                sleep 5
                clear
        elif [ "$answer" = 4 ]; then
                echo "🔨 Updating System..."
                ~/Scripts/update.sh
                echo "✅ Update Complete"
                sleep 5
                clear
        elif [ "$answer" = 5 ]; then
                hostname && uptime
                echo ""
                read -p "Press Enter to return to the menu..."
                clear
        elif [ "$answer" = 6 ]; then
                echo "📊 View Top Processes (press Q to quit)..."
                sleep 1
                htop
                clear
        elif [ "$answer" = 7 ];then
                sleep 1
                df -h /
                echo ""
                read -p "Press Enter to return to the menu..."
                clear
        elif [ "$answer" = 8 ]; then
                sudo /usr/local/bin/healthcheck.sh
                echo ""
                read -p "Press Enter to return to the menu..."
                clear
        elif [ "$answer" = 9 ]; then
                sudo /usr/local/bin/fail2ban-ip-lookup.sh
                echo ""
                read -p "press Enter to return to the menu..."
                clear
        elif [ "$answer" = 10 ]; then
                sudo /usr/local/bin/fail2ban-ip-lookup-extended.sh
                echo ""
                read -p "press Enter to return to the menu..."
        elif [ "$answer" = 11 ]; then
                sudo /usr/local/bin/bookstack-backup.sh
                echo ""
                read -p "press Enter to return to the menu..."
        else
                echo "🚫 invalid operation. Please choose a number on the menu."
        fi
done
📦 Requirements
Install these tools:
sudo apt install figlet vnstat htop lm-sensorsEnsure supporting scripts exist:
-
~/rkhunter.sh -
~/Scripts/update.sh -
/usr/local/bin/healthcheck.sh -
/usr/local/bin/fail2ban-ip-lookup.sh -
/usr/local/bin/fail2ban-ip-lookup-extended.sh -
/usr/local/bin/bookstack-backup.sh
💡 Notes
alias taskmenu='~/Scripts/taskmenu.sh'Then add to your ~/.bashrc:
echo "alias taskmenu='~/Scripts/taskmenu.sh'" >> ~/.bashrcUpdate #18 - RKHunter Daily Scan with Email Alerting and Log Cleanup
Date: June 3, 2025
Category: Security / Monitoring
Backlink: Update #17 – Installing Root Kit Detection on Virtual Private Server
Overview
This update enhances our RKHunter setup by:
-
Automating daily scans
-
Emailing warnings only (using
msmtp) -
Saving results to timestamped log files
-
Cleaning up old logs monthly
Script Location
/usr/local/bin/rkhunter.shScript Contents
#!/bin/bash

# === CONFIG ===
EMAIL="natenetworks.alerts@gmail.com"
LOGFILE="/var/log/rkhunter-manual-$(date +%F).log"
WARNING_LOG="/tmp/rkhunter-warnings.log"

# === RUN RKHUNTER TASKS ===
{
    echo "=== RKHUNTER SCAN STARTED: $(date) ==="
    sudo rkhunter --update
    sudo rkhunter --propupd
    sudo rkhunter -c -sk
    echo "=== RKHUNTER SCAN FINISHED: $(date) ==="
} | tee -a "$LOGFILE"

# === EXTRACT WARNINGS ONLY ===
grep 'Warning:' /var/log/rkhunter.log > "$WARNING_LOG"

# === EMAIL IF WARNINGS EXIST ===
if [ -s "$WARNING_LOG" ]; then
    {
        echo "To: $EMAIL"
        echo "Subject: ⚠️ RKHunter Warning Report - $(hostname) - $(date +%F)"
        echo "Content-Type: text/plain"
        echo
        echo "RKHunter has reported warnings on $(hostname) at $(date):"
        echo
        cat "$WARNING_LOG"
    } | msmtp -t
fi

# === CLEANUP ===
rm -f "$WARNING_LOG"
Scheduled Daily Cron Job
Added via root crontab:
sudo crontab -e30 3 * * * /usr/local/bin/rkhunter.shMonthly Log Cleanup
Old logs older than 30 days are purged automatically:
@monthly find /var/log/ -name "rkhunter-manual-*.log" -mtime +30 -deleteEmail Setup
-
Outgoing email uses
msmtp -
Alerts are only sent if
grep 'Warning:'finds any issues
Status
-
Email tested ✅
-
Logs cleanly date-stamped ✅
-
Monthly cleanup cron job added ✅
-
Script ownership and permissions secured ✅
Update #17 - Installing Root Kit Detection on Virtual Private Server
Date: May 30, 2025
Category: Security / System Monitoring
I am going to install rootkit detection on my VPS. This is good practice, although not many Linux servers are attacked in this way.
In this guide, I'll be installing and using chkrootkit and rkhunter.
Update and Upgrade:
sudo apt update && sudo apt upgrade -yInstall chkrootkit :
sudo apt install chkrootkit -y
Run the scan:
sudo chkrookit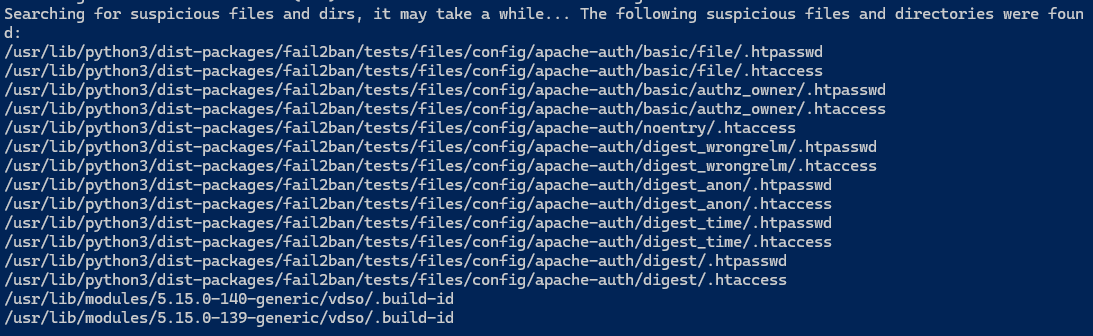
There was nothing found in most cases, but since I use Fail2Ban , these files are from its own test files, which include .htpasswd and .htaccessexamples. These are not actually security threats and are normal and expected.chrootkitflags these because .htaccess and .htpasswd can sometimes hide malicious behavior - but in this context, they're safe.
The two .build-id are also normal and expected. They are part of the Linux Kernel's vdso(Virtually Dynamically-linked Shared Object), which helps with performance for certain syscalls.
So this is clean, chrootkit is doing its job of alerting me of potentially dangerous file types, not actual infections.
In this case, all flagged items are false positives.
Now I'm going to move on and install RKHunter:
1.) Install RKHunter
sudo apt update
sudo apt install rkhunter -y
2.) Open RKHunter's Config File:
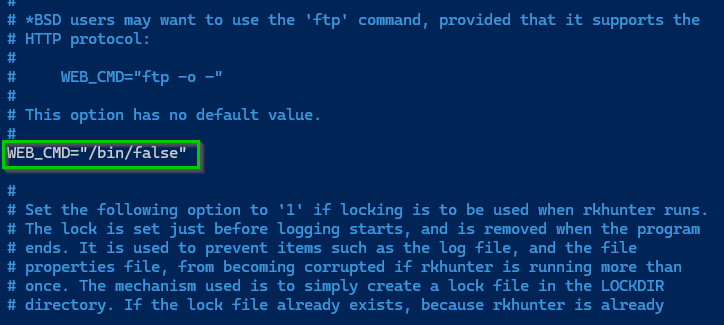
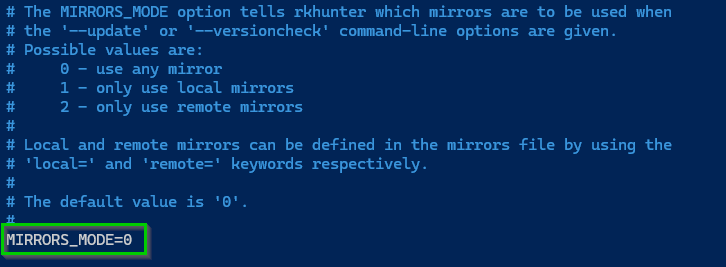
sudo nano /etc/rkhunter.confModify the following
Comment this out: use Ctrl + W to search the file and then type WEB_CMD
Use CTRL+W to search for UPDATE_MIRRORS and change it to 1
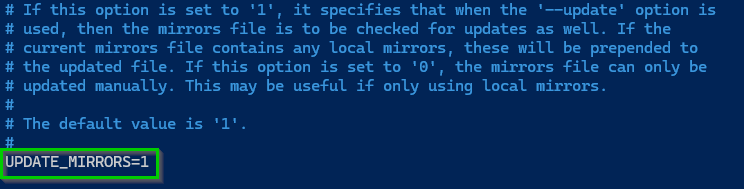
Do the same for MIRRORS_MODE and set that to 0
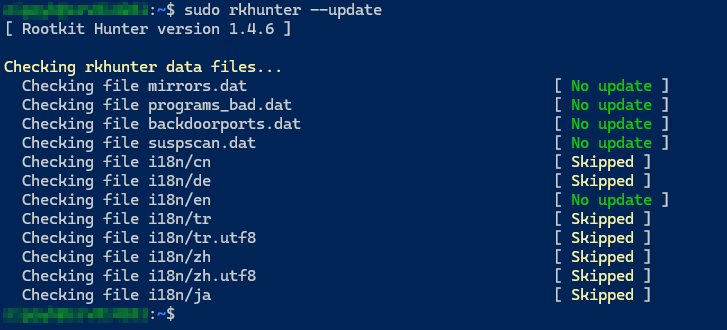
3.) Update RKHunter's Data Files
sudo rkhunter --updateThis pulls the latest rootkit definitions and mirror lists.
This is what you want it to look like, since it was freshly installed, nothing new was added:
Now lets run it:
sudo rkhunter --checkIt will check for possible root kits and the output should look like this:

Now you will have to make key presses by hitting ENTER to continue, in order to automate this we can run:
sudo rkhunter --check --skor the full command:
sudo rkhunter --check --skip-keypressThis will be useful when saving it to a logfile or scheduling it as a cron job.
It runs the scan fully unattended.
You can save the output.
Allows for scripts or email alerts!
Update #16 - Installing Docker and Prepping My VPS for App Expandability.
Date: May 23, 2025
Category: Server Management / DevOps
Backlink: N/A (First Entry in Docker Expansion Series)
My objective was to get Docker up and running on my existing VPS without migrating BookStack (yet). I wanted to ensure I could containerize and run additional apps while keeping BookStack fully operational, with no downtime during this transition. This setup gives me the flexibility to explore other projects in isolated environments while preserving my current production setup.
Setting this up can be found here: https://docs.docker.com/engine/install/ubuntu/
I'll run apt update to make sure my packages are updated.
sudo apt update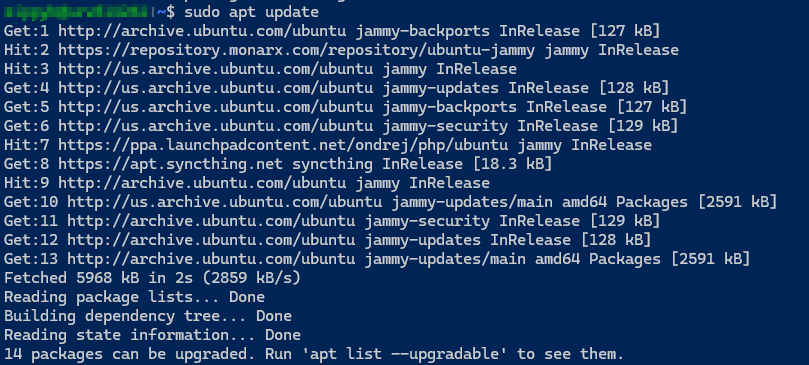
I also used app auto-remove to get rid of some old PHP packages:
sudo apt autoremove
So to install Docker, we need to build our app source line step-by-step.
Getting my system architecture:
dpkg --print-architecture
So I see it is amd64
I'll also need to get my Ubuntu Codename:
lsb_release -cs
So I see it is jammy
Now I can construct the Docker source line manually:
echo "deb [arch=amd64 signed-by=/etc/apt/keyrings/docker.gpg] https://download.docker.com/linux/ubuntu jammy stable"This code below writes it into the APT sources list at /etc/apt/sources.list.d/docker.list
echo "deb [arch=amd64 signed-by=/etc/apt/keyrings/docker.gpg] https://download.docker.com/linux/ubuntu jammy stable" | sudo tee /etc/apt/sources.list.d/docker.list > /dev/nullNow we can update the packages:
sudo apt updateI got an error like this
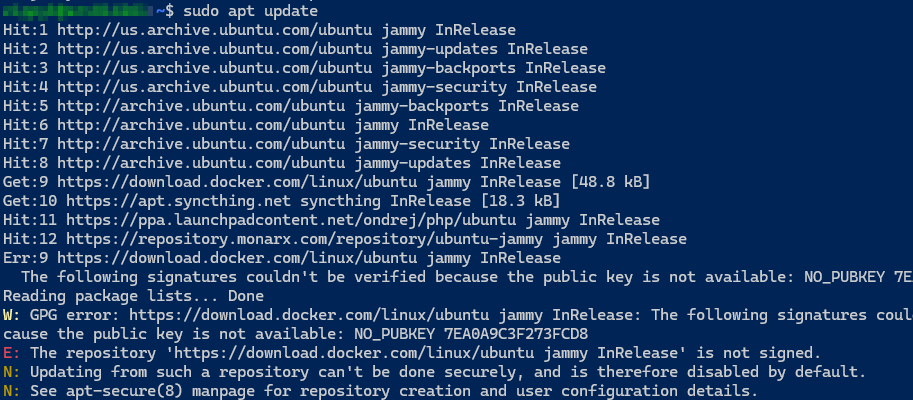
So I need to re fetch and add Docker's GPG Key Securely:
curl -fsSL https://download.docker.com/linux/ubuntu/gpg | \
  sudo gpg --dearmor -o /etc/apt/keyrings/docker.gpg
Then enure it is readable by APT:
sudo chmod a+r /etc/apt/keyrings/docker.gpgThen update the package list again:
sudo apt updateProceed with installing Docker:
sudo apt install -y docker-ce docker-ce-cli containerd.io docker-buildx-plugin docker-compose-pluginThis installs the docker engine, CLI Tools, Container runtime,, and Docker Compose plugin (V2)
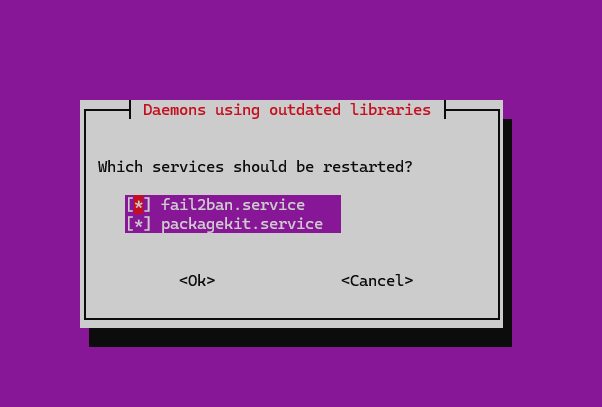
I left both services checked for restart and verified everything is installed.
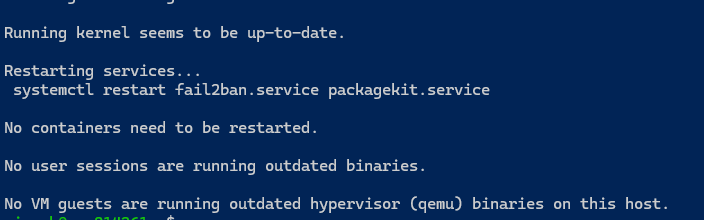
I'm now ready to use docker for some of my other projects and also didn't bring down the Bookstack at all while doing this.
Now I can enable docker with these commands:
sudo systemctl enable docker
sudo systemctl start docker

sudo usermod -aG docker $USER
# Logout and back in or run: su - $USER
Testing the docker installation:
docker run hello-world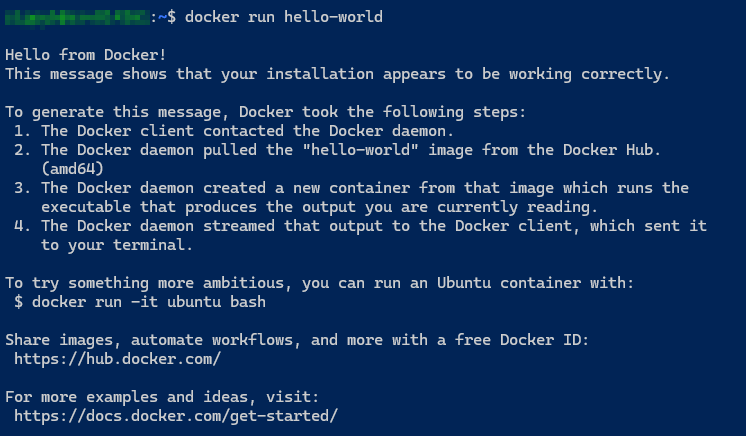
See the docker compose version:
docker compose version
Now I can make some project directories and change ownership and look at this for reference on where the projects will go:
This makes 3 different folder projects:
sudo mkdir -p /opt/docker/{bookstack,uptime-kuma,portainer}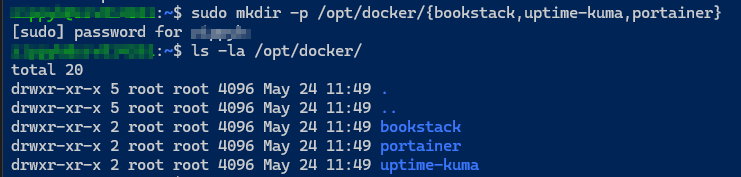
Now I can change ownership to my user for these folders:
sudo chown -R $USER:$USER /opt/docker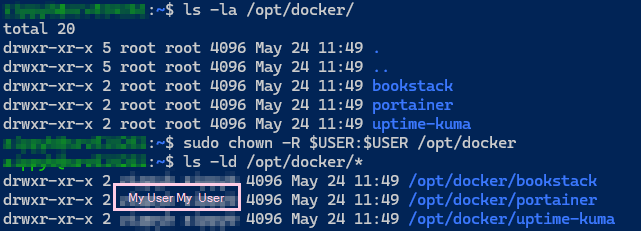
I'm officially Docker ready.
Update #15 - Using Gmail App Password to Get Alerts!
Date: May 22nd, 2025
Category: Security / Automation
Backlink: Update #14 – Auto-Banning Fail2Ban IPs Based on AbuseIPDB Reputation
I made a new Gmail account for alerts on my VPS.
I created a new app password:
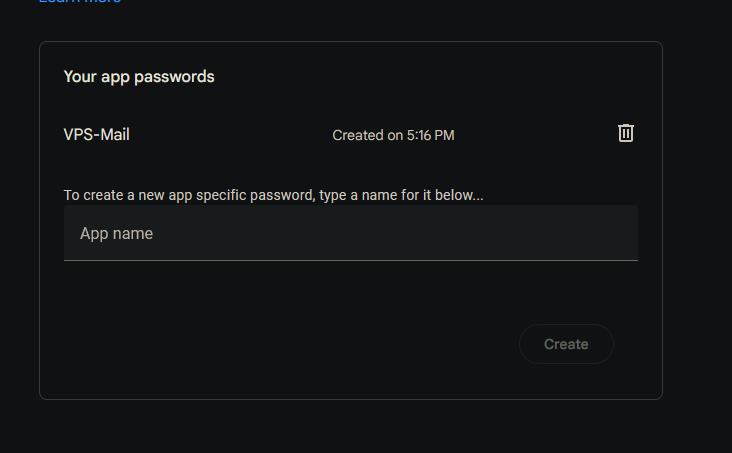
I installed a mail alert system via msmtp (Lightweight SMTP Relay Client) with Gmail Support:
sudo apt update
sudo apt install msmtp msmtp-mta -y
I hit no on this screen here: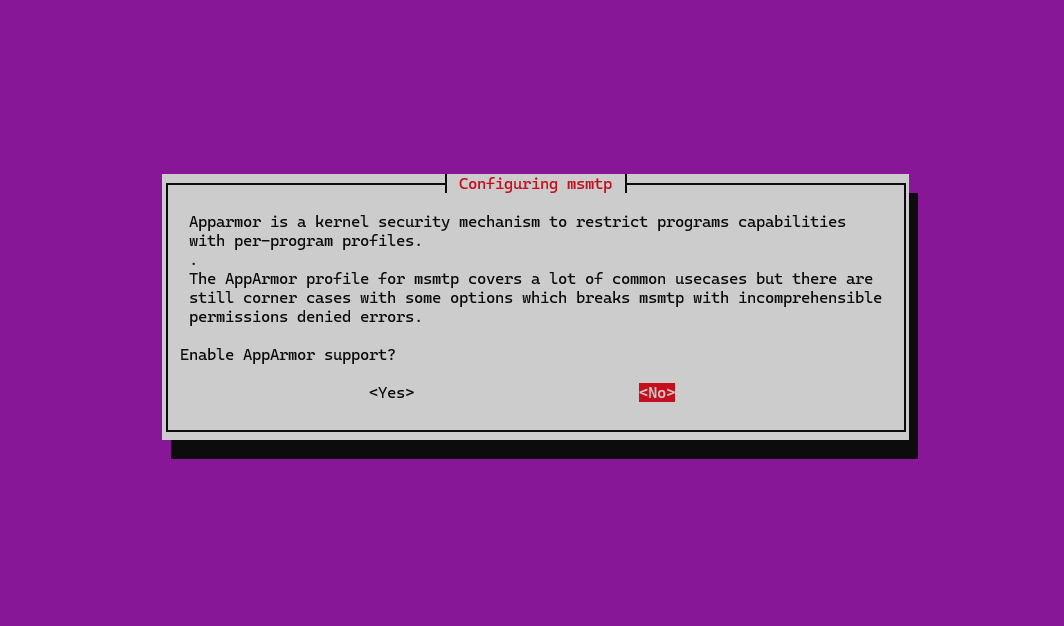
sudo nano ~/.msmtprcI filled in my email and app password within the file:
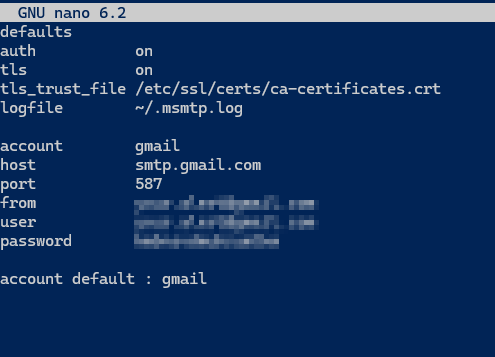
I secured the file using:
sudo chmod 600 ~/.msmtprcThe 600 meaning:
6 = read (4) + write (2) = read/write for the owner
0 = no permission for group
0 = no permission for others
I tested the file by echoing myself an email:
echo "Success! Email is working." | msmtp -v <your.email@here.com>If you have the app password set up and followed along you will get a email. It should say success on the bottom after running the command:

You can now use this to set up alerts for all different kinds of thing which I will do.
Update #14 - Auto-Banning Fail2Ban IPs Based on AbuseIPDB Reputation
Date: May 22nd, 2025
Category: Security / Automation
Backlink: Update #13 – Fail2Ban IP Lookup Enrichment Script with GeoIP, PTR, and AbuseIPDB
Overview
Building upon the foundation established in Update #13, this update introduces active enforcement logic to permanently block IPs based on their reputation score from AbuseIPDB.
The goal is to automatically detect and firewall-block any IPs that:
-
Are currently banned by Fail2Ban
-
Have a high abuse confidence score (≥75) according to AbuseIPDB
What’s New in This Update
| Feature | Status |
|---|---|
| AbuseIPDB reputation score enforcement | ✅ |
| UFW rule auto-injection per IP | ✅ |
| Duplicate ban protection | ✅ |
| Detailed logging for all actions | ✅ |
| Configurable abuse score threshold | ✅ |
Script Location
~/fail2ban-ip-lookup-extended.shLog Output
/var/log/fail2ban-ip-lookup.logLogs include:
-
Jail name
-
IP
-
Geo/IPInfo data
-
PTR record (reverse DNS)
-
AbuseIPDB score, reports, and last report time
-
Auto-ban status
Script Logic Flow
-
Get banned IPs from
sshdandufw-blockjails -
For each IP:
-
Fetch GeoIP data from IPInfo
-
Perform reverse DNS lookup
-
Query AbuseIPDB for score and report count
-
If
abuseConfidenceScore≥ 75:-
Check if IP is already blocked in UFW
-
If not, run
sudo ufw deny from [IP]with a comment
-
-
-
Write all output to
/var/log/fail2ban-ip-lookup.log
Script Excerpt (Auto-Ban Logic)
if [[ "$abuse_score" -ge "$ABUSE_THRESHOLD" ]]; then
    if sudo ufw status | grep -qw "$ip"; then
        echo -e "✅ Already blocked: $ip" | tee -a "$LOG_FILE"
    else
        echo -e "🚫 Auto-banning $ip due to high AbuseIPDB score ($abuse_score)" | tee -a "$LOG_FILE"
        sudo ufw deny from "$ip" comment "Auto-banned: AbuseIPDB score $abuse_score"
    fi
fi
Automation (Cron Job)
To run this script automatically once per day:
sudo crontab -eAdd this line (adjust path if needed):
0 3 * * * /home/<username>/fail2ban-ip-lookup-extended.shSecurity Note
This approach ensures that:
-
Banned IPs with high global abuse reputation are firewalled at the OS level
-
You retain full visibility and control over what’s blocked
-
Only IPs caught by both local behavior (Fail2Ban) and global reports (AbuseIPDB) are enforced
Safely Updating and Upgrading a Production VPS Server with Backup Plan
I noticed there was upgradable packages on the VPS Server I run. Since this is the one hosting BookStack Publicly on my Website, I wanted to treat this with as much caution as possible.
I wanted to check what was upgradable:
app list --upgradable
I leveraged AI to take a look at the packages that were upgradable and get a better understanding for my approach:
| Category | Safe to Update? | Notes |
|---|---|---|
cloud-init |
✅ Yes | Handles initial cloud setup. Updating is safe and common. |
grub-efi-* |
⚠️ Yes, with caution | These are bootloader packages. Safe but be cautious on production VMs. A reboot is required after update. |
libldap-* |
✅ Yes | Core system libraries. These affect services using LDAP but are safe to upgrade. |
monarx-agent |
✅ Yes | This is a Hostinger security monitoring agent. Regularly updated. |
php8.1-* |
✅ Yes | You’re using a PPA (deb.sury.org) for PHP — updates are fine and likely beneficial. Restart PHP-FPM afterward. |
I decided that the quick reboot wouldn't take long and services on my site aren't in need of scheduling a time for a reboot so I went ahead and did this while keeping an eye on the Cardinals game. If this were a critical system with many users operating on it, I would schedule a time to do these upgrades and restart (After-Hours) or wait until a need.
I took a snapshot of my server before running the upgrades:
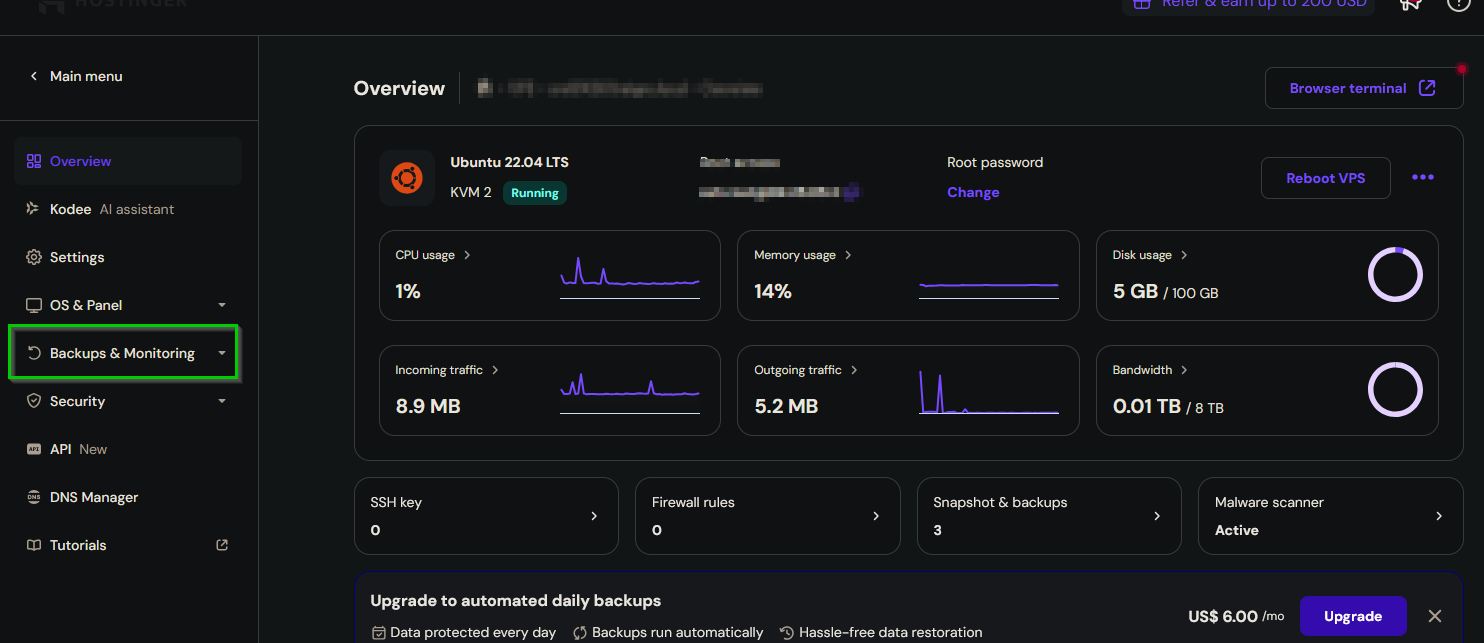
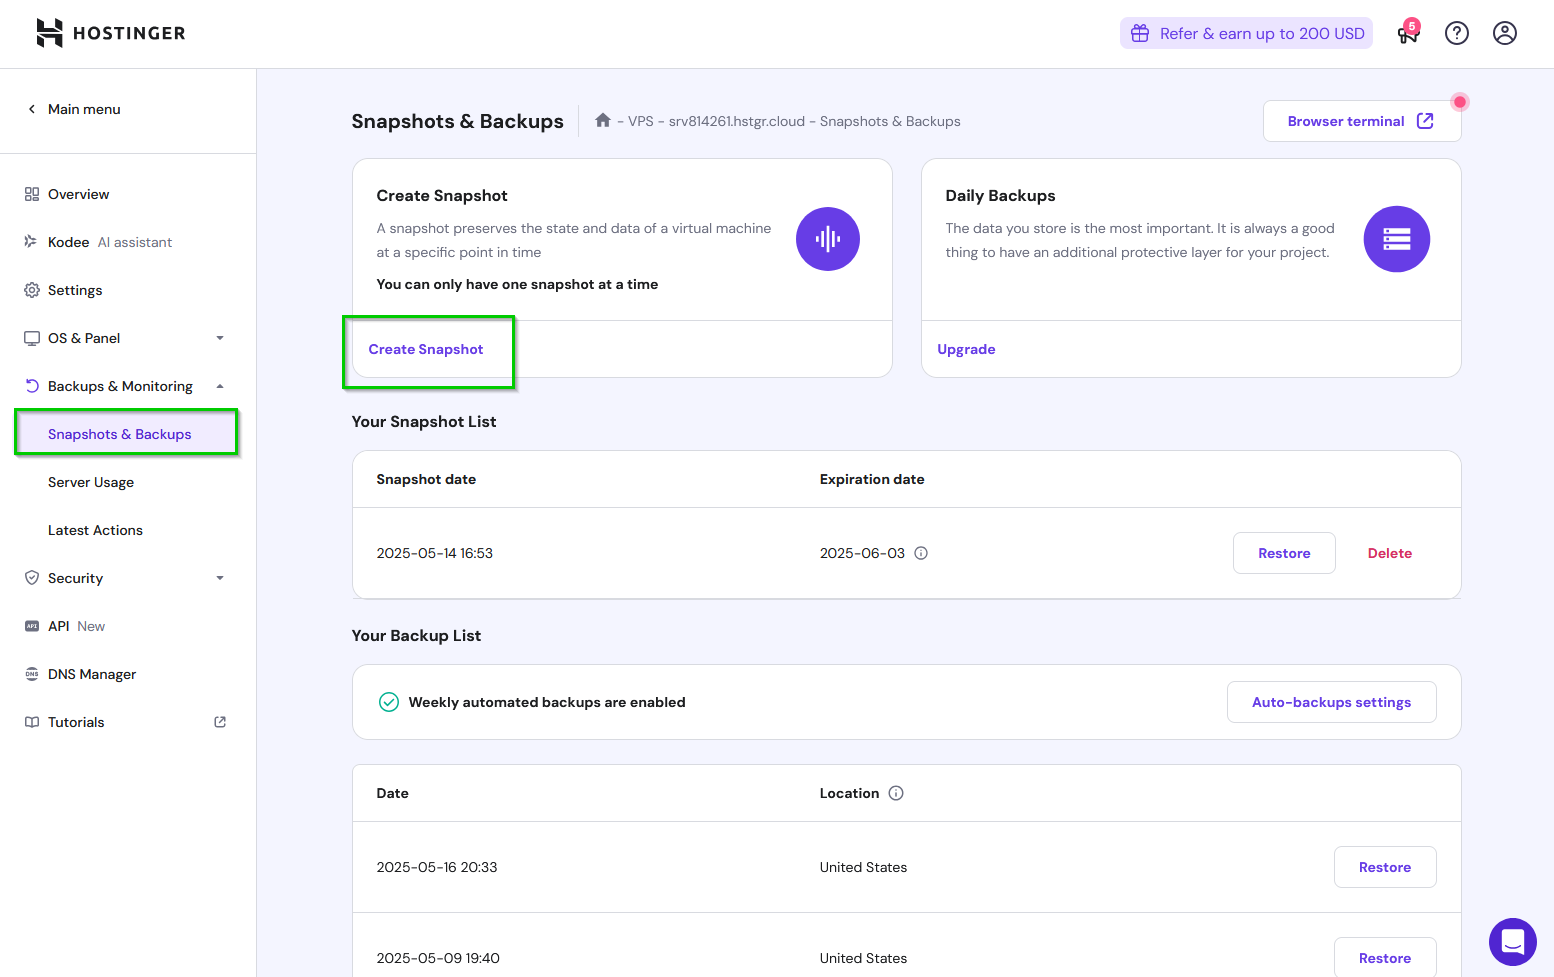

After the snapshot was complete, I went ahead with the update:
sudo apt update
sudo apt upgrade -y
I Ticked the boxes to restart services (PHP, MySQL, Etc)
Then I used:
sudo rebootI waited for the server to come back online and made sure that php, mysql, was all up and running.
SUCCESS!!
Update #13: Fail2Ban IP Lookup & Enrichment Script with GeoIP, PTR, and AbuseIPDB
Date: May 11, 2025
Category: Security / Automation
Backlink: Update #12 – Step-by-Step Breakdown of UFW DDNS Update Script
Objective
Build a script to automatically extract and enrich the IP addresses banned by Fail2Ban, giving deeper insight into:
-
Where attacks are coming from
-
Whether they’re part of known threat networks
-
If they’re associated with VPNs, datacenters, or residential ISPs
Tools Used
-
bash– for scripting -
fail2ban-client– to fetch banned IPs from jails -
ipinfo.io– to get geolocation and ASN details -
host– to perform reverse DNS lookups (PTR) -
AbuseIPDB– to identify IPs with high abuse confidence scores -
jq– to parse and format JSON responses -
tee– to send output to both screen and log file -
Logrotate – to manage log size and history
Script Behavior Summary
-
Enumerates Fail2Ban Jails
-
Targets:
sshdandufw-block -
Extracts unique banned IPs
-
-
Performs Lookup on Each IP
-
✅
ipinfo.io:-
IP
-
Hostname
-
City, Region, Country
-
ASN & ISP
-
Coordinates & Timezone
-
-
✅
host: PTR (reverse DNS) -
✅
AbuseIPDB:-
Abuse confidence score
-
Total number of reports
-
Last reported timestamp
-
-
-
Emoji-based Output for Quick Review
-
📍 IP address
-
🔁 PTR record
-
🛡️ Abuse summary
-
-
Writes to a Daily Log File
-
File:
/var/log/fail2ban-ip-lookup.log -
Rotated daily via Logrotate with:
-
7-day history
-
Compression
-
Ownership:
root:root
-
-
Logrotate Config
Path: /etc/logrotate.d/fail2ban-ip-lookup
/var/log/fail2ban-ip-lookup.log {
    su root root
    daily
    rotate 7
    compress
    missingok
    notifempty
    create 644 root root
}
Example Output
📍 IP: 137.74.246.152
"s03.cert.ssi.gouv.fr"
"Roubaix"
"Hauts-de-France"
"FR"
"AS16276 OVH SAS"
"50.6942,3.1746"
"Europe/Paris"
🔁 PTR: s03.cert.ssi.gouv.fr.
🛡️ Abuse Score: 100 | Reports: 45 | Last Reported: 2025-07-10T18:22:33Z
API Keys & Notes
-
IPINFO_TOKENandABUSEIPDB_API_KEYare stored securely in the script (omitted here). -
AbuseIPDB account was created under a free tier allowing 1000 queries/day.
-
Shodan integration may be added in future releases.
Future Plans
-
Create a filter to exclude known safe IPs from reports
-
Output top countries, ASNs, or ISPs from historical logs
-
Add optional email summary of banned IPs
Update #12 - Step-by-Step Breakdown of UFW DDNS Update Script
Date: May 11, 2025
Category: Automation / Firewall
Backlink: Update #11 – Syncthing UFW DDNS Cron Recovery & Long-Term Rule Persistence
Overview
This update documents the full working version of the update-syncthing-ufw.sh script, designed to automatically update UFW rules for Syncthing ports based on the current IP address of a DDNS hostname.
Script Location
/usr/local/bin/update-syncthing-ufw.shLog File
/var/log/update-syncthing-ufw.logFull Script Breakdown
#!/bin/bashStarts a bash shell script.
DDNS_HOST="<your-ddns-name"Specifies your DDNS hostname to resolve dynamically.
LOGFILE="/var/log/update-syncthing-ufw.log"Sets the path where all log entries will be stored.
PORTS=(
    "8384/tcp"
    "22000/tcp"
    "21027/udp"
)
Defines an array of Syncthing-related ports (Web UI, sync port, and discovery port).
timestamp() {
    date "+%Y-%m-%d %H:%M:%S"
}
Defines a helper function for timestamp formatting.
RESOLVED_IP=$(dig +short "$DDNS_HOST" | grep -E '^[0-9]+\.[0-9]+\.[0-9]+\.[0-9]+$' | head -n 1)Uses dig to resolve the IP for your DDNS and filter for valid IPv4 results.
if [[ -z "$RESOLVED_IP" ]]; then
    echo "$(timestamp) ❌ Failed to resolve IP for $DDNS_HOST" | tee -a "$LOGFILE"
    exit 1
else
    echo "$(timestamp) 🔍 Resolved IP for $DDNS_HOST: $RESOLVED_IP" | tee -a "$LOGFILE"
fi
Logs resolution status and aborts if the IP can't be resolved.
for PORT in "${PORTS[@]}"; do
    sudo ufw delete allow from any to any port "$PORT" comment 'Syncthing DDNS Access' > /dev/null 2>&1 || true
done
Deletes any prior rules with the comment 'Syncthing DDNS Access' silently. || true ensures the script continues even if a rule doesn't exist.
ALL_ADDED=trueTracks success status across all rule additions.
for PORT in "${PORTS[@]}"; doLoops over each port.
    if sudo ufw status | grep -q "$PORT.*$RESOLVED_IP"; then
        echo "$(timestamp) ✳️ Rule already exists: $PORT from $RESOLVED_IP" | tee -a "$LOGFILE"
If the rule already exists, log it as a no-op.
    elif sudo ufw allow from "$RESOLVED_IP" to any port "$PORT" comment 'Syncthing DDNS Access' > /dev/null 2>&1; then
        echo "$(timestamp) ✅ Rule added: $PORT from $RESOLVED_IP" | tee -a "$LOGFILE"
If the rule doesn’t exist, add it and log success.
    else
        echo "$(timestamp) ❌ Failed to add rule: $PORT from $RESOLVED_IP" | tee -a "$LOGFILE"
        ALL_ADDED=false
    fi
done
If adding fails, log an error and flag the batch as partially failed.
if $ALL_ADDED; then
    echo "$(timestamp) ✅ All UFW rules successfully updated for Syncthing from $RESOLVED_IP" | tee -a "$LOGFILE"
else
    echo "$(timestamp) ⚠️ Partial failure updating UFW rules for Syncthing from $RESOLVED_IP" | tee -a "$LOGFILE"
fi
Provides a final summary log depending on success/failure of all rule additions.
Fixes & Adjustments Made
-
Fixed
Permission deniederrors by ensuring the script runs withsudowhen needed and logs are only written by root. -
Replaced silent failures with emoji-marked status outputs (
✅,❌,⚠️,✳️) for readability. -
Confirmed logs rotate daily via
/etc/logrotate.d/update-syncthing-ufw.
Testing & Verification
-
Manual execution verified with:
sudo /usr/local/bin/update-syncthing-ufw.sh-
UFW rules confirmed using:
sudo ufw status verbose-
Log output tail:
sudo tail -n 20 /var/log/update-syncthing-ufw.logReference: Commonly Used Commands & Scripts for Virtual Private Server
Date: May 11, 2025
Category: System Administration / BookStack
Backlink: Update #11 – Syncthing UFW DDNS Cron Recovery & Long-Term Rule Persistence
System and Package Management
sudo apt update && sudo apt upgrade -y
sudo apt install [package-name]
sudo apt autoremove -y
sudo apt autoclean
Firewall (UFW)
sudo ufw status verbose
sudo ufw allow 'Apache Full'
sudo ufw allow 8384/tcp  # Syncthing Web UI
sudo ufw allow 22000/tcp # Syncthing Sync
sudo ufw allow 21027/udp # Syncthing Discovery
sudo ufw reload
sudo ufw delete [rule-number]
File and Directory Operations
ls -l /etc/logrotate.d/
cd /var/www/bookstack
sudo chown -R www-data:www-data /var/www/bookstack
sudo chmod -R 755 /var/www/bookstack
Services and Daemons
sudo systemctl status apache2
sudo systemctl restart apache2
sudo systemctl status fail2ban
sudo systemctl restart fail2ban
sudo systemctl enable syncthing@<username>
sudo systemctl start syncthing@<username>
Crontab and Scheduling
sudo crontab -l
sudo crontab -e
Log Management
sudo tail -f /var/log/fail2ban.log
sudo tail -f /var/log/ufw.log
sudo logrotate --debug /etc/logrotate.d/[filename]
BookStack Backup & Restore
sudo /usr/local/bin/bookstack-backup.sh
ls -lh /opt/bookstack_backups/
Common Scripts I Execute
sudo /usr/local/bin/update-syncthing-ufw.sh
sudo /usr/local/bin/update-fail2ban-ignoreip.sh
sudo /usr/local/bin/bookstack-backup.sh
sudo /usr/local/bin/syncthing-log-summary.sh
sudo /usr/local/bin/fail2ban-syncthing-report.sh
Update #11 - Syncthing UFW DDNS Cron Recovery & Long-Term Rule Persistence
Date: May 11, 2025
Category: Security / Automation
Backlink: Update #10 – Fail2Ban IP Geolocation Lookup Script with Auto-Filtering
Overview
This update builds upon our existing Syncthing and UFW/DDNS configuration and addresses the issue of persistent firewall rules disappearing after system events such as upgrades or restarts. It introduces mechanisms to automatically recover and persist UFW rules linked to DDNS-resolved IPs, as well as implement log rotation for our custom scripts.
Problem Summary
-
UFW rules allowing DDNS-bound access to Syncthing ports (8384, 22000, 21027) were occasionally disappearing.
-
There was no persistent re-application of these rules on reboot or after package upgrades.
-
A need existed to reduce log file size growth from regular UFW rule updates.
Key Changes Implemented
1. Syncthing DDNS-based UFW Script Improvements
-
Script Path:
/usr/local/bin/update-syncthing-ufw.sh -
Now includes:
-
Cleanup of old rules
-
Re-application of DDNS-resolved IP
-
IPv6 exception handling
-
Console output when run manually
-
Logged output when run via cron
-
#!/bin/bash

DDNS_HOST="your-ddns.example.com"
PORTS=(8384/tcp 22000/tcp 21027/udp)
LOG_TAG="Syncthing DDNS Access"

# Resolve IP
IP=$(dig +short "$DDNS_HOST" | grep -E '^[0-9]+\.[0-9]+\.[0-9]+\.[0-9]+$' | head -n1)

if [[ -z "$IP" ]]; then
    echo "❌ Failed to resolve IP for $DDNS_HOST"
    exit 1
fi

# Clean up existing rules for this tag
for port in "${PORTS[@]}"; do
    ufw status numbered | grep "$LOG_TAG" | grep "$port" | awk -F'[][]' '{print $2}' | tac | while read -r num; do
        ufw --force delete "$num"
    done
done

# Add new rules
for port in "${PORTS[@]}"; do
    ufw allow from "$IP" to any port "${port%/*}" proto "${port##*/}" comment "$LOG_TAG"
done

echo "✅ Cleaned and updated UFW rules for Syncthing from $IP"
2. Cron Automation for Rule Recovery
-
Location:
sudo crontab -e -
Jobs Added:
# Run daily at 3:00 AM
0 3 * * * /usr/local/bin/update-syncthing-ufw.sh

# Run every 10 minutes, prevents overlapping runs
*/10 * * * * flock -n /tmp/ufw-ddns.lock /usr/local/bin/update-syncthing-ufw.sh >> /var/log/update-syncthing-ufw.log 2>&1

# Run on reboot
@reboot /usr/local/bin/update-syncthing-ufw.sh >> /var/log/update-syncthing-ufw.log 2>&1
3. Logrotate Setup for UFW Update Logs
-
File:
/etc/logrotate.d/update-syncthing-ufw -
Content:
/var/log/update-syncthing-ufw.log {
    su root root
    daily
    rotate 7
    compress
    missingok
    notifempty
    create 644 root root
}
Additional Files and Paths
| Script | Path |
|---|---|
| Syncthing DDNS UFW Script | /usr/local/bin/update-syncthing-ufw.sh |
| Cron Log File | /var/log/update-syncthing-ufw.log |
| Logrotate Config | /etc/logrotate.d/update-syncthing-ufw |
Testing
-
Verified successful rule refresh via
sudo ufw status -
Confirmed script logs rotation using
logrotate --debug -
Confirmed cron execution via
grep update-syncthing-ufw /var/log/syslog -
Script executes correctly manually and via cron.
Conclusion
This update ensures that DDNS-based access to Syncthing is consistently maintained with automatic recovery and no risk of bloat from excessive log growth. The solution is now reliable through reboots, daily updates, and in the event of system changes like package upgrades
Update #10 - Fail2Ban IP Geolocation Lookup Script with Auto Filtering
Date: May 11, 2025
Category: Security / Automation
Backlink: Update #9 – Syncthing UFW Log Monitoring with Active Fail2Ban Enforcement
Overview
This update improves visibility into the origin of IP addresses actively banned by Fail2Ban on the VPS. The goal was to enrich situational awareness for brute-force SSH attempts and UFW-blocked Syncthing port scans by fetching country, city, and provider data for each offender.
What Was Implemented
-
A Bash script named
fail2ban-ip-lookup.shwas written to:-
Pull current banned IPs from the
sshdandufw-blockjails -
Skip link-local IPv6 addresses (
fe80::/10) -
Query ipinfo.io for geolocation and network information
-
Format and display the results cleanly with color-coded output (when using
jq)
-
-
Optional
jqintegration was added to format the JSON neatly -
The script can easily be expanded to:
-
Save results to logs
-
Exclude private IPv4 ranges (
10.*,192.168.*, etc.) -
Run on a cron schedule for daily snapshots
-
Example Output
📍 IP: 116.110.12.54
"116.110.12.54"
"Thanh Khê"
"Da Nang"
"VN"
"AS24086 Viettel Corporation"

📍 IP: 8.222.230.39
"8.222.230.39"
"Singapore"
"Singapore"
"SG"
"AS45102 Alibaba (US) Technology Co., Ltd."
Script Location
Stored at:
~/fail2ban-ip-lookup.shDependencies
curl (usually preinstalled)jq: Install using:
sudo apt install jq -ysudo apt install jq -y
Future Improvements
-
Add logging with timestamps
-
Auto-reporting for suspicious regions
-
Integration into BookStack as a daily monitored report
Update #9 - Syncthing UFW Log Monitoring with Active Fail2Ban Enforcement
Date: May 10, 2025
Category: Security / Monitoring
Backlink: Update #8 – Syncthing Systemd Recovery After Upgrade
Overview
This update strengthens the security posture of Syncthing on the VPS by combining UFW logging with active Fail2Ban enforcement. In addition to passively monitoring IPs attempting to access Syncthing ports (8384, 22000, 21027), we now automatically ban repeat offenders, reducing risk and exposure from persistent probing.
A custom Fail2Ban filter and jail were added to detect and block malicious IPs based on UFW blocks. Link-local IPv6 traffic (fe80::/10) is ignored to avoid false positives.
Goals
-
Detect blocked access attempts on Syncthing ports via UFW.
-
Ban repeated offenders automatically using Fail2Ban.
-
Maintain a summarized view of access attempts for visibility.
Files and Configuration
UFW Log Summary Script
Stored at: ~/syncthing-log-summary.sh
#!/bin/bash

# Syncthing ports of interest
PORTS="8384|22000|21027"

# Log file
LOGFILE="/var/log/ufw.log"

# Output summary
echo "Top IPs attempting to access Syncthing ports (8384, 22000, 21027):"
echo "---------------------------------------------------------------"

# Extract and count IPs, excluding fe80::/10 (IPv6 link-local)
sudo grep "UFW BLOCK" "$LOGFILE" | \
grep -E "DPT=($PORTS)" | \
grep -v "SRC=fe80:" | \
grep -oP 'SRC=\K\S+' | \
sort | uniq -c | sort -rn | head -20
Fail2Ban Filter: /etc/fail2ban/filter.d/ufw-block.conf
[Definition]
failregex = \[UFW BLOCK\].*SRC=<HOST>.*DPT=(8384|22000|21027)
ignoreregex = SRC=fe80::
Fail2Ban Jail Configuration: /etc/fail2ban/jail.local
[ufw-block]
enabled = true
filter = ufw-block
action = iptables[name=UFW-Blocked, port=all, protocol=all]
logpath = /var/log/ufw.log
maxretry = 3
findtime = 600
bantime = 43200
This jail looks for repeated blocks on Syncthing ports and bans IPs for 12 hours after 3 failed attempts within 10 minutes.
Monitoring
Run this command at any time to review the top offending IPs:
bash ~/syncthing-log-summary.sh
To review currently banned IPs by this jail:
sudo fail2ban-client status ufw-block
To unban an IP (example):
sudo fail2ban-client set ufw-block unbanip 192.0.2.1
Status
-
UFW logging confirmed active.
-
Syncthing ports protected behind dynamic DDNS-controlled rules.
-
Fail2Ban jail banning repeat offenders.
-
Link-local IPv6 traffic excluded to reduce noise.
Update #8 - Syncthing Systemd Recovery After Upgrade
Date: May 10, 2025
Category: System Maintenance / Automation
Backlink: Update #7 – Syncthing UFW Rule Automation with DDNS Integration
Overview
After performing a system upgrade on the VPS hosting BookStack and Syncthing, it was discovered that Syncthing no longer started correctly under the user-level systemctl --user session. Attempts to restart the service resulted in a Failed to connect to bus: Connection refused error, likely due to the user session being interrupted by the upgrade process.
The Problem
-
After the package upgrades, the Syncthing service appeared to be inactive.
-
Running:
systemctl --user restart syncthingresulted in:
Failed to connect to bus: Connection refused
The Solution
Switched Syncthing from a user-level service to a system-wide service tied to the user account.
Steps Taken:
-
Stopped any failed user service attempts (optional but safe):
systemctl --user stop syncthing -
Enabled the system-wide service instead:
sudo systemctl enable syncthing@<username>.service sudo systemctl start syncthing@<username>.service -
Verified Syncthing is active:
sudo systemctl status syncthing@<username>.service
Optional Consideration
If future system upgrades disrupt services again, I will consider using a simple systemd timer or cron job to periodically check and restart Syncthing, though this is not currently necessary due to the stability of the system-wide service.
Update #7 - Syncthing UFW Rule Automation with DDNS Integration
Date: May 10, 2025
Category: Security / Automation
Backlink: Update #6 – Fail2Ban Security Hardening
🔧 Overview
This update focused on hardening access to Syncthing on the VPS. Instead of allowing unrestricted access to the Syncthing web UI and sync ports, I created a secure and automated solution that dynamically resolves a DDNS hostname (masked here for privacy) and updates UFW rules accordingly. This ensures only the current home IP can connect to the Syncthing interface and sync services.
🛠️ Tools & Technologies Used
-
Syncthing – Installed and configured on a headless Ubuntu VPS
-
UFW (Uncomplicated Firewall) – Manages allowed IP access
-
DDNS (Dynamic DNS) – Tracks home IP address
-
Bash Script – Automates the rule refresh process
-
Systemd Cron Job – Scheduled execution of the automation
🔄 The Process
-
Validated Syncthing Setup
-
Confirmed Syncthing was installed and running.
-
Located its config and ensured
127.0.0.1:8384was listening.
-
-
Allowed Necessary Ports
-
Syncthing uses:
-
8384/tcp– Web GUI -
22000/tcp– Sync traffic -
21027/udp– Local discovery
-
-
Initially opened ports to
Anywhereto confirm functionality.
-
-
Wrote an Automation Script
I created/usr/local/bin/update-syncthing-ufw.shto:-
Resolve the DDNS hostname to a public IP.
-
Delete any existing UFW rules for
8384,22000, and21027. -
Add new rules allowing traffic only from the current IP.
✅ Sample success message:
✅ UFW rules updated for Syncthing services from [masked DDNS IP] -
-
Confirmed It Works
-
Ran the script manually.
-
Verified UFW rules with
sudo ufw status numbered. -
Accessed the Syncthing Web UI remotely from home IP to confirm access.
-
-
Cleaned Up UFW Rules
-
Removed
Anywhererules for Syncthing ports. -
Only the resolved DDNS IP is now allowed per service port.
-
-
Created a Daily Cron Job
-
Added the following to root's crontab:
0 */6 * * * /usr/local/bin/update-syncthing-ufw.sh -
This updates the rule every 6 hours in case the home IP changes.
-
✅ The Result
-
Syncthing Web UI and sync features are only accessible from home IP.
-
All UFW rules now reflect the current public IP automatically.
-
No more manual UFW updates or security exposure.
-
This complements previous hardening efforts made in Update #6.
🔍 What I Learned
-
UFW’s rule numbers change dynamically; scripting is essential for removal before re-addition.
-
You can safely update firewall rules on a schedule without needing manual login.
-
Protecting even the Web GUI of Syncthing is important in public VPS setups.
-
DDNS + automation = powerful security combo.
Update #6 - Fail2Ban Security Hardening - Longer Bans, Fewer Chances
After implementing a dynamic ignoreip rule using my DDNS hostname in Update #5, I proceeded to further harden my Fail2Ban configuration. The goal was to tighten lockout criteria and extend ban durations to reduce the risk of brute-force attacks on my VPS.
What I Changed
-
Increased Ban Duration:
Setbantimeto12hso attackers are kept out for a long stretch. -
Shortened Detection Window:
Setfindtimeto10m, limiting how far back Fail2Ban looks for failed attempts. -
Stricter Retry Limit:
Setmaxretryto3, meaning three failed login attempts trigger a ban. -
Updated
jail.localConfiguration:
[DEFAULT]
ignoreip = 127.0.0.1 <dynamic-ip-from-ddns>
bantime = 12h
findtime = 10m
maxretry = 3
Note: The <dynamic-ip-from-ddns> is automatically updated via a custom script that resolves my DDNS hostname and inserts the current IP.
Verification
To confirm the configuration was working as expected, I ran:
sudo fail2ban-client status sshd
sudo tail -f /var/log/fail2ban.log
This verified that failed attempts were being logged, and offenders were banned promptly after 3 failures.
Result
The system is now more secure, allowing fewer login attempts and keeping bad actors out longer. With dynamic DDNS-based whitelisting and aggressive jail parameters, my SSH service is much better protected going forward.
Update #5 - Dynamic Fail2Ban Ignore Rule with DDNS
Update #5
Dynamic Fail2Ban Ignore Rule with DDNS
Overview
To enhance security while ensuring admin access from a dynamic IP address, I created a script that automatically resolves my home DDNS address.
and updates Fail2Ban’s ignoreip rule accordingly. This ensures my home IP is always whitelisted—even as it changes—preventing accidental lockouts.
Objective
Automatically update Fail2Ban’s ignoreip field with the resolved IP address of a DDNS hostname and restart the service.
Components Used
-
Ubuntu 22.04 VPS
-
Fail2Ban
-
DDNS hostname
-
Bash scripting
-
Cron for automation (optional)
Script Path
/usr/local/bin/update-fail2ban-ignoreip.sh
Script Logic
-
Uses
digto resolve the current IP of the DDNS hostname. -
Backs up
/etc/fail2ban/jail.local. -
Replaces the existing
ignoreipline with a new one including127.0.0.1and the resolved DDNS IP. -
Restarts the Fail2Ban service.
#!/bin/bash

# Resolve DDNS to IP
DDNS_HOST="YOUR-DDNS-NAME-HERE"
RESOLVED_IP=$(dig +short "$DDNS_HOST" | grep -Eo '([0-9]{1,3}\.){3}[0-9]{1,3}' | head -n1)

# Path to jail.local
JAIL_LOCAL="/etc/fail2ban/jail.local"

# Backup original
cp "$JAIL_LOCAL" "$JAIL_LOCAL.bak"

# Update ignoreip in jail.local
sed -i "/^ignoreip =/c\ignoreip = 127.0.0.1 $RESOLVED_IP" "$JAIL_LOCAL"

# Restart Fail2Ban
systemctl restart fail2ban
Setup Steps
Create the script:
-
Paste the script above, change it to YOUR-DDNS-SERVER - save and exit.sudo nano /usr/local/bin/update-fail2ban-ignoreip.sh
Make it executable:
-
Run it manually to verify:
sudo /usr/local/bin/update-fail2ban-ignoreip.sh
Verification
-
Checked with:
sudo cat /etc/fail2ban/jail.localConfirmed the new IP is listed in
ignoreip. -
Validated Fail2Ban is running:
sudo systemctl status fail2ban
Optional: Automate with Cron
To run the update daily:
sudo crontab -eAdd:
0 3 * * * /usr/local/bin/update-fail2ban-ignoreip.shResult
Fail2Ban now dynamically ignores my home IP—even though it’s behind a DDNS—and I no longer risk locking myself out while administering my VPS.
Update #4 - Automated Backups for BookStack on VPS - Secure & Scheduled
Update #4
As part of hardening and maintaining my public BookStack instance hosted on a VPS, I implemented a secure, automated backup system using shell scripting and cron. This ensures my database and uploaded files are regularly archived and protected against data loss - without exposing sensitive information in scripts.
The Setup
-
VPS: Ubuntu 22.04 LTS (Hostinger)
-
Web Stack: Apache, MySQL, PHP 8.2 (LAMP stack)
-
Application: BookStack (latest stable)
-
Backup Destination:
/opt/bookstack_backups/on the VPS -
Security Enhancements:
-
fail2banactive -
SSH hardening complete
-
UFW configured to allow only necessary services
-
The Process
-
Created a Shell Script
-
A custom script (
/usr/local/bin/bookstack-backup.sh) was written to:-
Dump the MySQL
bookstackdatabase -
Archive important BookStack directories (such as
/var/www/bookstack/public/uploadsand/var/www/bookstack/storage/uploads) -
Rotate old backups by removing any older than 7 days
-
-
-
Secured MySQL Credentials
-
Rather than placing the database password in the script (which is insecure), credentials were stored securely in the root user's
~/.my.cnffile:[client] user=bookstack password=your_db_password
-
-
Tested the Script
-
Verified manual execution of the script:
-
Confirmed
.sqldumps and.tar.gzfiles were created correctly -
Ensured proper permissions and ownership of backup files
-
-
-
Scheduled Daily Cron Job
-
Added the script to root’s crontab to run automatically at 2:00 AM each day:
0 2 * * * /usr/local/bin/bookstack-backup.sh
-
Sample Output
Backup files generated daily look like:
-
/opt/bookstack_backups/bookstack_2025-05-09.sql -
/opt/bookstack_backups/bookstack_files_2025-05-09.tar.gz
What I Learned
-
Avoid using
mysqldumppasswords in scripts —~/.my.cnfis a secure alternative. -
Giving the database user
PROCESSprivilege was necessary to prevent dump errors. -
Always verify permissions and script execution manually before automating via cron.
-
Storing backups under
/opt/keeps them cleanly separated from web content.
Update #3 - Hardening Security of the BookStack.
After migrating my BookStack documentation system to a public-facing VPS, my next priority was to harden the server. The goal was to lock down remote access, guard against brute-force attacks, and ensure the system was updated automatically, all while maintaining reliable access for legitimate admin use.
The Setup
The VPS is running Ubuntu 22.04 LTS, hosting BookStack on a full LAMP stack. With the public site live, it was time to secure the perimeter.
The Process
1. Hardened SSH Configuration
I edited /etc/ssh/sshd_config to improve SSH security:
-
Disabled root login
-
Disabled password-based authentication
-
Enforced key-based authentication
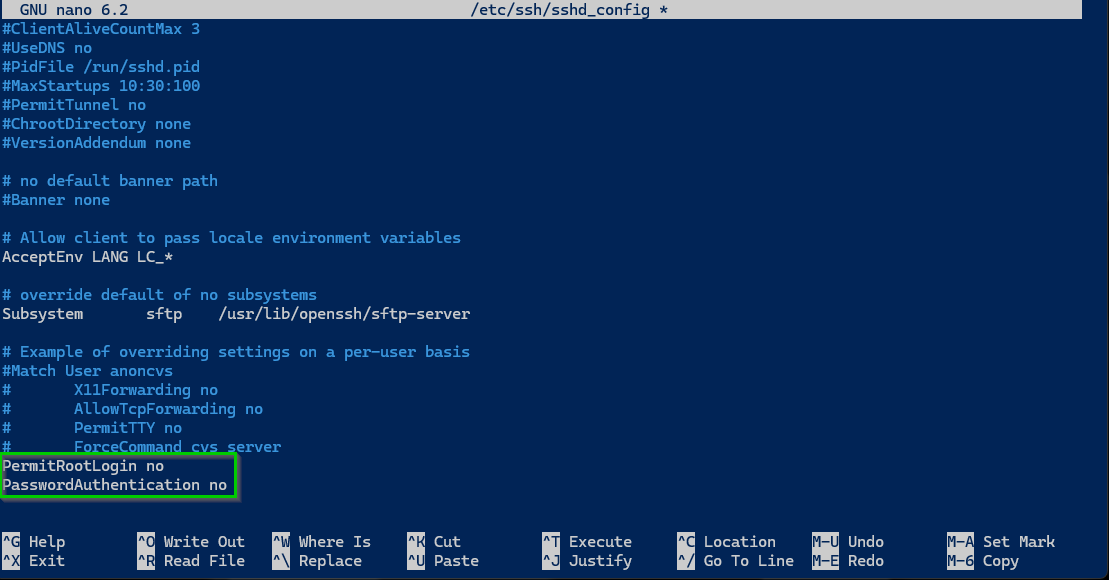
Once updated, I restarted SSH:
sudo systemctl restart ssh2. Enabled UFW Firewall
I verified UFW firewall settings to ensure only necessary traffic was allowed:
-
OpenSSH for SSH access
-
Apache Full for BookStack
3. Installed and Configured Fail2Ban
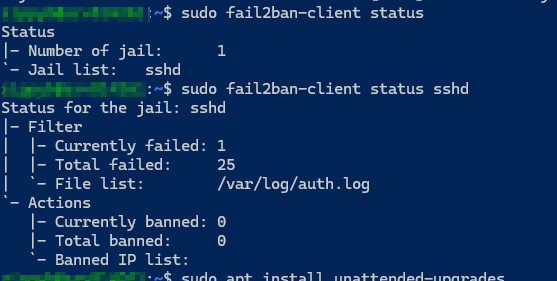
Fail2Ban helps block brute-force attacks. After installation, it was monitoring the SSH log (/var/log/auth.log).
sudo apt install fail2ban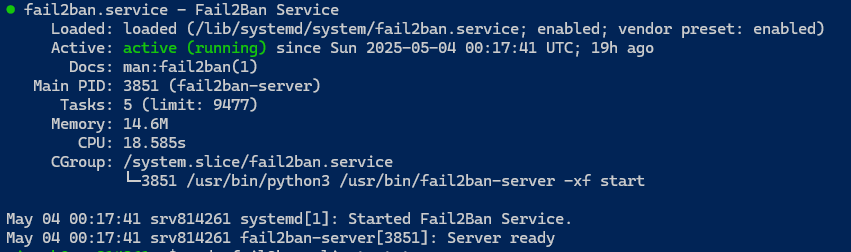
Screenshot: Fail2Ban Jail Status
4. Enabled Unattended Security Updates
To keep the VPS patched automatically, I installed and configured unattended upgrades:
sudo apt install unattended-upgrades
sudo dpkg-reconfigure unattended-upgrades
This ensures security updates are applied daily with minimal overhead.
The Result
The VPS is now protected with hardened SSH access, firewall filtering, brute-force detection, and automatic security patching, while keeping full control over my public documentation setup.
What I Learned
-
A single open SSH port can attract attention fast
-
Disabling root login and passwords makes a big difference
-
Fail2Ban provides great peace of mind
-
UFW simplifies firewall management
-
Automated updates are essential for long-term hardening
Command Guide To Backing Up Bookstack
This is done for this bookstack here.
Changing to the projects directory /var/www/bookstack
cd /var/www/bookstackUse mysqldump
-u is for user
-p is for password
*the bookstack following the -p in the code is the name of the database and not the password. You will enter the password.*
This will make you enter a password for the mysql root user in order to backup the database.
*Change the date, I will update this code to use the current time instead of manually putting it in.
sudo mysqldump -u root -p bookstack | sudo tee bookstack.backup_3_28_24.sql > /dev/nullCopying that backup file to the network share example:
sudo cp -r bookstack.backup_3_28_24.sql /mnt/localcloud/BookStack_Backups/Backup the Storage / Uploads / Themes / Public
sudo tar -czvf bookstack-files-backup_3_28_24.tar.gz .env public/uploads storage/uploads themesCopy that to the network share:
cp bookstack-files-backup_3_28_24.tar.gz /mnt/localcloud/BookStack_Backups/The backup is now on the network share...
Guide: Backing Up Straight From The BookStack Website
Backup
There are two types of content you need to backup: Files and database records.
Database
The easiest way to backup the database is via mysqldump:
|
If you are using MySQL on Ubuntu, and are using the root MySQL user, you will likely have to run the command above with sudo:
|
The resulting file (bookstack.backup.sql in the examples above) will contain all the data from the database you specified. Copy this file to somewhere safe, ideally on a different device.
Files
Below is a list of files and folders containing data you should back up. The paths are shown relative to the root BookStack folder.
.env- File, contains important configuration information.public/uploads- Folder, contains any uploaded images.storage/uploads- Folder, contains uploaded page attachments.themes- Folder, contains any configured visual/logical themes.
Alternatively you could backup up your whole BookStack folder but only the above contain important instance-specific data by default.
The following command will create a compressed archive of the above folders and files:
|
The resulting file (bookstack-files-backup.tar.gz) will contain all your file data. Copy this to a safe place, ideally on a different device.
Restore
If you are restoring from scratch follow the installation instructions first to get a new BookStack instance set-up but do not run the php artisan migrate installation step when installing BookStack. You may need to comment this command out if using an installer script.
If you are using a docker-container-based set-up, restore the database before running the BookStack container. An example of the process using a linuxserver.io-based docker-compose setup can be seen in our video here.
Database
To restore the database you simply need to execute the sql in the output file from the mysqldump you performed above. To do this copy your database SQL backup file onto the BookStack or database host machine and run the following:
|
If you are restoring to a new version of BookStack you will have to run php artisan migrate after restore to perform any required updates to the database.
Files
To restore the files you simply need to copy them from the backup archive back to their original locations. If you created a compressed bookstack-files-backup.tar.gz archive as per the backup instructions above you can simply copy that file to your BookStack folder then run the following command:
|
If you get errors during the above command it may be due to permissions. Change permissions so you can write to the restore locations.
After a backup of the files you should reset the permissions to ensure any write-required locations are writable by the server. The locations required for this can be found in the installation instructions.
Configuration (.env File)
During a restore, you may end up merging various configuration options between your old and new instance .env files, to get things working for the new environment. For example, it’s common to use the old .env settings for most things but use database settings from the .env file of a newly created instance.
One thing to be aware of is that you should use the APP_KEY value of the old .env file since this is used for various features like the encryption of multi-factor authentication credentials. Changing the APP_KEY may cause such features to break.
URL Changes
If you are restoring into an environment where BookStack will run on a different URL, there are a couple of things you’ll need to do after restoring everything:
- Within the
.envconfig file update theAPP_URLvalue to exactly match your new base URL. - Run the “Update System URL” command to update your database content to use your new URL.
If you migrated web-server configuration files, you may also need to tweak those to correctly use the new URL.
BookStack Backup Automation Every 6 Hours
Creating a script to automate your BookStack backup process is definitely feasible, even with the requirement to input a password for the `mysqldump` command. You can streamline the process with a script that bundles these steps together. However, automating password input for `mysqldump` securely can be a bit tricky due to security concerns with storing plaintext passwords. Here’s a general approach to handle this:
### Automating `mysqldump` Without Exposing Passwords
Instead of embedding the MySQL password in the script, you can use a configuration file (`~/.my.cnf`) for the user running the backup. This file stores the MySQL credentials and allows `mysqldump` to access them without requiring them to be input manually or stored in the script.
1. Create the MySQL Configuration File:
On the user’s home directory that will run the backup, create a file named `.my.cnf`:
sudo nano ~/.my.cnf
Add the following content, replacing `your_password` with the MySQL root password:
 [mysqldump]
 user=root
 password=your_password
Secure the file by setting its permissions so that only the owner can read and write:
chmod 600 ~/.my.cnfWriting the Backup Script
Now, let’s create a script that encompasses your backup steps. The script will not require manual password entry due to the use of the `.my.cnf` configuration.
#!/bin/bash

# Variables
BACKUP_DIR="/mnt/localcloud/BookStack_Backups"
DATE=$(date +"%m_%d_%Y")
DB_BACKUP_FILE="bookstack_db_backup_$DATE.sql"
FILES_BACKUP_FILE="bookstack_files_backup_$DATE.tar.gz"

# Navigate to the projects directory
cd /var/www/bookstack

# Database backup
mysqldump bookstack | sudo tee "$BACKUP_DIR/$DB_BACKUP_FILE" > /dev/null

# Backup the Storage / Uploads / Themes / Public
sudo tar -czvf "$BACKUP_DIR/$FILES_BACKUP_FILE" .env public/uploads storage/uploads themes

echo "Backup completed and stored in $BACKUP_DIR"
Explanation: This script backs up the database using `mysqldump`, directing the output to a file in your network share directory. It also creates a tarball of your specified directories and stores it alongside the database backup. The `date` command is used to append the current date to the filenames, automating the date management process.
Running the Script Automatically
To run this script automatically, you can use `cron`:
1. Open the current user’s crontab:
crontab -e2. **Add a cron job to run the script at your desired frequency.** For example, to run it daily at 1 AM:
0 1 * * * /path/to/your/backup_script.sh3. Here's how to do it every 6 hours, and also pointing at the right path to my installation of bookstack.
0 */6 * * * /home/zippyb/backupbookstack.shReplace `/path/to/your/backup_script.sh` with the actual path to your script. Make sure the script is executable (`chmod +x backup_script.sh`).
Important Considerations
- Security: Ensure that the `.my.cnf` file and the backup script are securely stored and accessible only by trusted users.
- Backup Rotation: This script doesn’t handle backup rotation (deleting old backups to save space). You might want to add logic to delete backups older than a certain number of days.
- Testing: Test your backup and restoration process to ensure it works as expected before relying on it for production use.
This setup provides a basic framework. Depending on your specific needs and environment, you may need to adjust paths, permissions, or other details.
Raspberri Pi 5 NAS Setup Jeff Gerling
BookStack VPS Migration & Setup Documentation
Summary
This documentation outlines the successful migration of a self-hosted BookStack instance from a local Proxmox environment to a cloud-hosted VPS. The goal was to maintain all user data, uploaded content, and configuration with minimal downtime.
🔗 Live Instance: https://docs.natenetworks.com
🏗️ Technologies Used
Infrastructure
-
Host Provider: Hostinger VPS
-
Operating System: Ubuntu Server 22.04 LTS
-
Architecture: 64-bit KVM VPS
Core Stack (LAMP)
-
Web Server: Apache 2
-
Database: MariaDB (MySQL-compatible)
-
PHP: 8.2 with required extensions
-
Application: BookStack v24.02.2 (Laravel-based)
Domain Configuration
-
DNS: A record for
docs.natenetworks.compointing to VPS public IP -
URL Configuration: Set in
.envand updated viaartisancommand
Tools Used
-
SSH Client: PuTTY
-
SFTP Client: WinSCP
-
Source Control: Git
-
PHP Dependency Manager: Composer
-
Laravel CLI: Artisan
🚀 Migration Process
1. VPS Preparation
Logged into the VPS via SSH and installed required packages:
sudo apt update && sudo apt upgrade -y
sudo apt install apache2 mariadb-server php8.2 php8.2-common php8.2-cli php8.2-mbstring php8.2-curl php8.2-xml php8.2-mysql unzip git curl composer
2. BookStack Deployment
Cloned the official BookStack repository:
sudo git clone https://github.com/BookStackApp/BookStack.git /var/www/bookstack
cd /var/www/bookstack
git checkout 24.02.2
Installed PHP dependencies:
composer install --no-dev --optimize-autoloader
Set correct file permissions:
sudo chown -R www-data:www-data /var/www/bookstack
sudo chmod -R 755 /var/www/bookstack
3. Configuration
-
Restored
.envfile from backup -
Updated
APP_URLto:https://docs.natenetworks.com -
Verified required PHP extensions
-
Ensured Apache service was active
4. Database Setup
-
Created database and user credentials for BookStack
-
Restored MySQL dump from local backup:
mysql -u bookstack -p bookstack < /tmp/bookstack.backup_5_3_25.sql
5. File Migration
Uploaded archive of uploaded files and customizations via SFTP, then extracted:
tar -xzf /tmp/bookstack-files-backup_5_3_25.tar.gz -C /var/www/bookstack
6. Laravel Maintenance Commands
Cleared and rebuilt application cache:
php artisan config:clear
php artisan cache:clear
php artisan view:clear
Updated stored URLs in the database:
php artisan bookstack:update-url http://192.168.1.236 https://docs.natenetworks.com
7. Final Testing
Restarted Apache and verified everything was operational:
sudo systemctl restart apache2
-
Public site loaded successfully
-
All pages, users, and uploads migrated cleanly
-
Admin accounts remained intact
🧾 Notes
-
All user and admin accounts retained post-migration
-
SQL and file backups preserved externally
-
Public/private visibility was maintained
-
SMTP email is not currently configured (
.envuses defaults)
Migration Date: May 4th, 2025
Lead Engineer: Nathaniel Nash
Environment: Production (Public Access)